
>The May dress… the tribal maxi dress or the Mrs. Roper dress? You decide…
June 6, 2011 § 26 Comments
>
Morning dragonflies! It’s a late, late post today. I spent the weekend obsessing about quilt strips, obsessively cleaning the house and engaging in various other obsessions that don’t immediately come to mind, but avoiding winged insects such as yourselves was up there on the list.
But it’s Monday and here I am, back at my computer. I FINALLY finished my May dress, wore it to a graduation party, brunch and afternoon lounging and I can report that covering oneself with swaths of cotton and silk voile is actually BETTER than it sounds. And I know it sounds awesome, right? Right. So here’s a picture.

The uber serious expression is due to my using my mind rays to ensure the skirt would flutter properly to just GET THE &*()#&) PICTURE ALREADY!! While I like the dress just fine when it’s sitting calmly and not showing off all the underskirts, it’s really best in motion. And you ALL know how hard it is to get something to flutter appropriately using the self timer, right? This was compounded by my having about 5 feet of floor space in which to move around. So while I include a few photos where I appear to be striding about confidently, feel free to amuse your dragonfly fancies by knowing that a majority of the leg shots were obtained by my awkwardly kicking out my leg, hoping for the perfect amount of arty motion-blur, flashes of pink and yellow, minimized cankles and relatively upright posture. And don’t even ask. The outtakes have already been deleted.
But let’s get down to business, there’s a lot of details to get through here. For the background, this is my May dress, with the bodice loosely based on Burda 7697 (an envelope pattern) and the skirts sort of just cobbled together. Here’s the two previous posts: Inspiration and the bodice muslin & Finishing the bodice and draping the skirt.
More pictures? Ok. First, here’s a few from the front, showing the skirts in different stages of flutter.


And from the back – I made a clever little belt (well, I thought it was clever) out of some completely-not-matching-but-works-ok green and pink iridescent dupioni silk. More on that below.

The skirts. They move.
When I started plotting out my maxi dress I ran into a bit of a conundrum drafting the skirts.
1) I wanted them to be flowy
2) I wanted to avoid a lot of bulk (like with a dirndl skirt*) at the waist and the hips
3) I wanted to be able to move my legs (check out this post from stitchywitch of Green Apples to see the inherent problem with maxi dresses with dirndl skirts!)
3) I wanted to make my own pattern (well, I couldn’t find a pattern that I liked) and am too lazy to draft an actual, long flared skirt piece.
4) Even if #4 didn’t apply, I wanted to use the fabric as efficiently as possible and flared/gored skirts use more fabric with more waste.
5) If if #s 3 AND 4 didn’t apply, I wanted to use the selvages as the hems, so I wanted a straighter skirt to retain the straight hemline
6) Since I was working with sheer, light (um, easily unraveled) fabric, I wanted as few seams as possible with good finishing since they might be visible through the layers.
7) I was working with sheer fabric and wanted to wear the dress without a slip
8) I had started with the main print, which is silk and cotton and lovely. I found the yellow butterfly print that coordinated PEFECTLY, but my legs were angry that the eyeballs would get to look at the pretty silk fabric while while the dress was on my body, but the legs wouldn’t be able to feel it.
9) I was using an elastic casing, so I needed the top of the skirt wide enough to stretch over my bust so I could get the dress on, but with as little gathering as possible, for a more sleek look.
*For those of you that don’t know, a dirndl skirt is a basic rectangle that has been gathered in at the waist. Very, very easy, but not the most sleek or flattering of looks for many of us flying insects.

OK, that’s about it. I was trying to balance the need for movement against the desire for a very simple skirt style for ease of sewing and hemming. Plus mix my funky fabrics AND still get to have silk against my skin! To tackle the fabric mixing and desire for silk (#s 6 and 7), I got some nice hot pink silk/cotton voile to use as a lining. I played with the fabrics and here was my final game plan:
Skirt #1 (the lining) Standard dirndl with a slit for movement, ONE seam, the ‘offset center seam’, slightly offset from the center.
Skirt #2 (the yellow contrast) This skirt was attached to the bodice with an overlap, which took some of the width/gathers out of the waist, but provided for very free movement.
Skirt #3 (main skirt) I used a drapey trick to provide LOTS of movement at the offset center front slit/seam area. Also, I attached at the front by gathering the BODICE into the skirt, so the skirt front was very smooth. There’s still lots of gathers in the back, though. The entire front is left free, only attached at the top to the bodice, so again, lots of freedom for movement!
The mix of skirts worked well! I LOVED wearing the skirt. It has a gypsy vibe, doesn’t it? Mr. Bug called it the egyptian princess dress. No offense to Cleopatra, of course. I think he may have been responding more to the nail-studded flips I wore yesterday, though! Here’s a buncha pictures of the skirt on the move…

Drafting the skirt lining
A bit more detail on the skirts. You can click on any of the illustrations to (hopefully) see them more up close. First, for the pink lining skirt. I started out with a big rectangle of fabric that was about 60” long (from cut edge to cut edge). This fabric was 60” wide, so I cut down to 46” – the length for my skirt. I finished both cut ends with a narrow double folded hem and left the long edge unfinished.

I sewed the finished ends together from the waist to about knee length. I secured with a zigzag set with a length of 0 – I was nervous about this part ripping and it’s mostly hidden under the other skirts.
I pressed the seam allowances to the side. The seam allowances looked like a french seam, since they’d been hemmed prior to sewing together.

As a final step, I stitched the seam allowances to the skirt with a decorative stitch – sort of like doing a flat felled seam. Then I held up to figure out where I wanted to slit to hang on my body – it’s about 5” from my center front. I stretched between two fingers to find the ‘sides’ and cut notches at the two side spots, then ran gather stitches between the notches and sewed to the inside of the bodice so that the inside of the dress was smooth with no seam allowance showing at the waist. Here’s what the top of the slit looks like – see my excessive zigzag anchor stitch there??

Next up, the underskirt
I’d chosen the easiest method for the lining– a simple gathered rectangle. For the underskirt I wanted something with a bit more movement so the lining would show while I was moving. Also, I wanted to ease off on all those gathers at the top of the skirt and I was a bit concerned about the slits tearing. For the underskirt I decided to do an overlap at the top with some pleats to take out a bit more width as well as add to the drapey effect. I also hoped that by bringing in the waist so much I’d cause the hem of the skirt to flare a bit.
I hemmed the cut ends and cut the fabric down to 46” as I did with the lining. I used the selvage as the hem on this skirt as well. I’ve marked below where I placed the pleats (on the right) – I folded out about 6” total with the pleats. I’ve also marked the overlap sections on the skirt piece.
Here’s how the finished skirt looked!

Below is a shot of the actual skirt close to the top edge. I embellished the hemmed ends with the same decorative stitch as I used on the lining for some continuity. I’ll tell you what, this poly chiffon was a BEAR to sew – especially compared to the cotton/silk voile! And don’t get me started on ironing it. I ended up using steam a seam to keep the edges under control while I was hemming.
I found the center in the same way as I had with the lining, marked the side seams and ran gathering stitches along the back. I didn’t need much gathering in the front as I’d removed so much width with the pleats and the overlap. I sewed the underskirt to the RIGHT side of the bodice, so at this point there were NO seam allowances showing on the inside OR outside of the dress – they were sandwiched between. It would have worked better had I sewn the underskirt to the inside of the dress so the lining and underskirt seam allowances were both pointing towards the right side, but luckily I’d cut these skirts slightly too long, so my quick fix (more on that in the next section) when attaching the main skirt helped by shortening the skirts about an inch, although it wasn’t the cleanest finish…

The main skirt – all dangly ends!
The main skirt was definitely the most fussy. The method I used to construct it was new for me AND since it was all going to show, I wanted it to be nice!
First I trimmed the fabric down – I trimmed this a bit shorter – around 44”, because I wanted the other two layers to show AND because the other two skirts had been a bit long. Also, since a lot of the dangly bits in the front would be from the TOP edge of the fabric, I decided to attach the selvage edge to the bodice, so the nicely finished selvage would be shown off. I hemmed the hem and sides with a narrow double fold hem.
I’m not sure if this is clear, but basically, the stars in the illustration below show the points ‘offset center front’ – all of the fabric between the stars was attached to the bodice, the rest was left to hang free. Once I attached the skirt, I cut away the shaded areas and hemmed the raw edges. The points that I cut away were long and dragging on the ground.
Here’s a sketch of how the skirt hangs. See the stars at the top of the skirt. The black hexagons show (roughly) where those cut away corners would be. The shaded area shows the drapey part of the fabric, much of it the wrong side of the skirt.

When I attached this skirt I didn’t want ANy gathers on the front, so I pinned the starred points in place on the bodice, then smoothed the skirt to the bodice as far as the side seams on the bodice. I clipped at that point to mark, then ran gathering stitches between the two clips for gathering on the back.
When I started to sew the main skirt on, I realized that I should have sewed the underskirt to the inside rather than the right side of the bodice in order to cleanly sandwich the bodice between the skirts. Since the fabric was so thin and I could do with a bit less length I just neatly folded the underskirt to the inside of the bodice, effectively encasing the seam allowances of the underskirt AND the lining skirt. Then I sewed the main skirt to the outside. This meant I was sewing through a LOT of layers – all the seam allowances PLUS an extra layer of underskirt and main skirt. It was easy to sew through, but hard to get a nice, straight seam. Since I was planning on covering/embellishing I was OK with that. For this project.
Here’s the skirt with the ‘drapes’ pulled out to the sides.

And here, with everything hanging willy nilly. I really like the effect – it moves when I walk to show off that crazy butterfly polyester!

Ah yes! The belt.
I had been planning on a self-braided embellishment, but when I experimented I didn’t really like it. I’d been thinking of the braid along the neckline with a long, long belt piece that could wrap around me a couple of times. I didn’t like it along my neckline because I’d rather wear jewelry than have an embellished neckline and I thought the braid would look funny on its own around my middle! I dug through my stash and found about quarter yard of some lovely dark green and pink dupioni silk. I made a quick belt.


I wanted something wider that would keep its shape, so I decided to use some boning. Here’s a quick rundown of the steps I used making the belt.
- Sew long edges together, turn and press
- Fold short ends together to find center. Quick press to mark.
- Center needle on pressed center mark, stitch first edge of center boning channel.
- My belt piece was 4.5” wide and I wanted a gathered effect, so I cut boning 2.5” wide and slid inside the belt.
- Switched to zipper foot, stitched other side of center boning channel.
- Gathered belt to same width as boning piece – I just used my fingers, although I could have run gathering stitches as well. Stitch again across gathers on both sides to secure.
- Checked for side positions be holding belt up to me and centering the center boning on my midriff.
- Repeated above steps to sew in side channels.
- Folded one end in, pressed and topstitched.
- Attached the buttons that ‘show’ to the topstitched short end.
- Topstitched the other short ends – I left unfinished because I like how the selvage looks!
- Checked length and then put in snaps so that the belt fits snug.

I like the belt and may do something similar for other full skirted dresses where I want the sash-like look – the Crepe comes to mind!
In closing… thoughtful and introspective, or inattentive navel gazer?

>Finally! A coat for Mr. Bug! Burda 7780
March 8, 2011 § 17 Comments
>
Morning beanstalks and affiliated vegetables! I’m happy to report that after a year-long standoff I have finally conquered Burda 7780 and provided a coat for Mr. Bug so that he no longer is forced to scamper off to work with his poor suit coat sticking out from under his much-shorter Carhart. He not only agreed to a photoshoot, but even indulged me by putting on my favorite cashmere sweater and jeans to properly show off my camel-colored masterpiece! What our poor men do for us!
Ah… where to begin? Well, as I’ve mentioned a few times over the past year, Dan picked out the wool and lining so that I could make him a coat sometime last spring. Actually, I think it was March, so it really HAS been a year. I’m so naughty. He picked out a very nice dark black (navy?) suit weight wool with a windowpane pinstripe. And some great lining material! Here’s his original choice, along with the pattern…
I stared down that wool forever. Finally spurred on by the lady grey sewalong, I managed to get a muslin made from some very stiff twill. That was last October. In my (very weak) defense, I was distracted by starting working at my new job, which involved a lot of other sewing, and then the Minnesota winter kicked in and I realized that I’d missed the fall window of opportunity for making a wearable coat (at least, wearable with the underlining I had bought! – this is a 30-50 degree coat!) The muslin has been hanging in the sewing room since then. I finally returned to it last month, thinking that it would be a good Valentines present. Ah well. At least it’s done now!
You’ll note that the final coat is NOT in the wool Dan chose. I just couldn’t bear making a coat from that wool, thus the foot dragging over the whole project. First, I was a bit intimidated by the pattern matching with those tiny little pinstripes. I’m not a big fan of the precision required for pattern matching, and my perfectionist tendencies are SUPER magnified when making things for others, especially Dan. My second, much larger, hangup with the wool he chose is that we own a white basset hound who sheds like a maniac. I didn’t even think I’d be able to protect the coat during the sewing process and once done, I didn’t think Dan would like it much, as it would show off every single white hair. I finally dug through my stash and found a lovely camel wool flannel that I’d been hoarding for a pair of trousers. It was a good sacrifice – the color looks nice on Dan, is flexible enough for weekend and work wear and doesn’t show off those pesky basset hound hairs! Would it be wrong to slather my hound in nair? Do they still make that? Here’s Dan with the felon herself…
So. Construction. The Burda pattern was full of typical Burda looniness. And to make matters worse, I somehow convinced myself that if I followed the pattern, then I could skip all the little tailoring extras that really were necessary for this coat. I did a few extras, adding a back stay.
As well as shoulder stays and taping the shoulder seams…

Some might recall my welt-pocket experiments of last fall. While the pattern called for double welt pockets and had some very bad instructions as to how to do those, I ended up going for single welt pockets, thinking it’d be easier to get them perfect. In the end, I’m not sure that it was a good idea. For one thing, I followed the instructions in the tailoring book that a lot of you probably have on your own bookshelves, and there’s somewhat wrong in the instructions, I think. The stitching line on the welt is a full inch away from the center of the pocket opening, when I think it needs to be only a half inch away. I got the pockets to work, but there’s a lot of hand stitching and steam involved, and they’re still pretty wavy. Not my best effort. I need to just take time to do more practice pockets at some point.
I did a few other things that caused me problems as well. I underlined the coat with a cotton flannel underlining I bought in the drapery section at Hancock. I just attached the lining and underlining pieces by basting (by machine, really, best done by hand!) and treated as one piece. In general, that worked well enough, but I had to cut full lining pieces rather than the half lining included in the pattern. I just used the front and back pattern pieces to cut the lining, not paying much attention to the length, thinking that I’d just hem it to look good. Turns out, it’s not that easy hemming a super slippery lining attached to flannel in any way, shape, or form. It would have been MUCH better to decide how long the lining should be and adjust the pattern piece accordingly to do a lot of my ‘hemming’ while cutting out the pieces. I ended up doing a LOT of hand basting and stitching to wrestle the lining hem into a seemingly straight line. 
The other self-inflicted problem I had was the collar. Like I said, I blindly decided that if I just followed the directions, I could skip any tailoring techniques. The collar is a two part collar and the instructions don’t do anything to deal with the extra fabric left over on the undercollar due to the turn of the cloth. That, plus the kooky markings that Burda uses equaled a pretty wonky collar. I ended up ripping the points of the collar, realigning everything and handstitching from the right side to make sure there was at least some semblance of symmetry. Again, if I’d have ditched the Burda instructions and followed the barest minimum of the instructions from the tailoring book I would probably have spent half the time and experienced half the stress. Ah well, live and learn. Slow sewing should be the ticket, I guess!
One technique that I did use from the tailoring book was their method of inserting the lining by machine. Usually when I do linings I construct two versions of the coat – one is the shell, the other is the lining with the facings. Attach along the center front and hem, turn and then attach the sleeve hems. This time I constructed the coat from the wool, attached the facings, then attached the lining body to the coat and basted the arm openings together. Then I attached the sleeve hems by machine, turned up the sleeves and sewed the lining arms to the body arms by hand. While it was super satisfying to slipstitch the lining arms in, I’m not sure why this is the preferred method in the book. It seemed to take a lot more time with not a lot of upside. what am I missing? Here’s a closeup of the lining arm seam…
Here’s Mr. Bug wearing the coat with his work clothes and working the buttons!
I’ve been making an attempt at cleaning up my machine buttonholes better lately – all those pokey little threads look so messy. Of course, my handsewn buttonholes aren’t really much better looking. Anyone have any hints on getting buttonholes to look nice?

The coat design is nice and simple. There’s a centerback seam, although I’m not certain why it’s there! I cut a size 40 for Dan and removed an inch of length from the sleeves, three inches from the body and I moved up the pockets about an inch and a half.
All in all, it’s a great coat! I think Dan looks very handsome indeed! And
since we’re finally warming up (to the low 30’s, people. It’s so cold here!) it’ll be a great spring coat for him!
>Better late than never… a Mondo tribute outfit.
November 24, 2010 § 14 Comments
>
So folkses. I’ve actually had this sweater in my possession (unhemmed, of course) since a few days after the terrible event that I still can’t talk about without tearing up. Freaking amazon hipster stealing the win from Mondo, he of the kneesocks and tapdancing… It took me forever to finish the skirt (and hem the sweater.) So here’s a quick little unveling of my Mondo tribute outfit… First, me winning a staring contest with Lucy the hound.
The sweater is made from my modified Hot Patterns Weekender Cabana t-shirt pattern (served up with a bow here!) This was my first serger project, and let’s just say I was THIS CLOSE to going with a flashdance- inspired neckline. Also, I’m happy to report that I still possess all of my fingers and most of my hair, despite the nefarious serger’s best efforts to rob me of both. The sweater is made from a very squeaky acrylic sweater knit that I got from Joann’s. Not the nicest fabric I’ve ever touched, but polka dotted sweater knit. How could I pass it up?
The skirt is made from a crazy loosely woven purple/grey/black woven. I lined with hot pink Ambiance. I was recently overcome with giddiness, having found a local source for every single color of Ambiance under the sun as well as hair canvas! The skirt fabric is ridiculous. I serged the edges, stabilized with twill tape, zig-zagged extra, treated with general loving kindness and was repaid with an unraveling mess. I have serious concerns that the skirt will fall apart upon it’s first trip out of the house. Live and learn…
The skirt pattern is another Franken-Jenny – the skirt pattern is from Vogue 8648, a dress pattern, with the waistband from the Burda Jenny pattern. The skirt displays some of the tricks I’ve found to make a pencil skirt work, no pockets (obvs), very high waistband that creates an hourglass shape, very textures fabric to hide various lumps and bumps and a lining to make everything slide around nicely. I would have liked to remove a bit more width from the hem (i.e. pegging) – I skipped that due to the raveling issue. The princess seams were holding it together so I didn’t want to mess with a good thing. Now that I see the photos, I am thinking I might hem it a bit shorter…
Here’s the side/back/front views – Mr. Bug and I tried another photo session, it was still pretty weird. Also, have I mentioned how much I hate the lack of light?


And why is this a Mondo tribute outfit? Well, thanks to EW.com and the Heidi K., I can show you…
Because I have a more than normal dose of self confidence, of course I like my version better. Followed by the Mondo original (those shoulders! the cuffs!) Heidi’s version, not so much. The lack of sleeves bums me out!
>Jenny’s weird cousin, Bertha.
November 7, 2010 § 18 Comments
>
Anyone who avidly reads my blog posts and sporadic comments on other blogs will know that I have a reluctance to assemble my Burda Jenny pattern that borders on pathological (even with excellent suggestions of paper cutters!) So I did the laziest thing possible. I cut out the waistband from the Jenny pattern and made a a franken-Jenny out of the skirt portion of Vogue 8648 (my green wool dress). Not content with going against every single wardrobe recommendation ever printed, I decided my high-waisted pencil skirt would only do in a creamy white, super nubby mystery fabric. Behold!
The main difference between the real Jenny and this skirt is that the shaping comes from princess lines rather than Jenny’s darts. My dart-sewing skill leaves something to be desired, and even if I was the most excellent dart-sewer in the universe, I’m not sure that darts provide enough opportunity to make a pencil skirt that skims over my various lumps and bumps and stays on the right side of frumpy.
The waist band for the Jenny skirt is shaped slightly concave, so that the top and bottom of the waistband are the same length, and the center of the waistband is slightly smaller. I cut the waistband as drafted, but ended up taking in the top of the waistband significantly, which makes sense, since my ribcage is smaller than my waist. Hello Weeble. My name is pear…
I added a vent using The Cupcake Goddess tutorial for adding a vent to a skirt and lining. There’s something up with the vent, though. I’m starting to suspect that I cut the lining backwards and sewed it in anyway. I’ll have to investigate further. I know it seems like that’s something that should be easy to figure out, but seriously, vents and linings are slightly less confusing than subjugating verbs was in college Latin classes. What’s a gerund again?
Last tidbit – the fabric is a cotton blend and came from the upholstery section. I lined with rayon (oooo!!! silky!) and finished the lining hem with some bright orange hem lace. The zipper is just centered in the back and I put in by hand. My favorite way!
I will leave you with a bunch of photos. Belt, no belt. Boots, pumps. Cardigans, long shirts, tucked in shirts…


I love seeing pictures of finished garments! I’m not sure which version is my favorite. What’s your vote?
Also, I really AM TRYING to get away from mirror pictures, but I can’t get my camera (a Canon Powershot)to focus when I have it on self-timer (usually I focus by pressing the button down half way,) and when Mr. Bug takes photos of me, it’s as awkward for both of us as a junior high date. Advice, anyone?
>Sewing for the man. A muslin.
October 29, 2010 § 9 Comments
>
I pounced on Dan (figuratively, of course) the minute he walked through the door tonight and got him to pose in the muslin for his man-coat, Burda 7780. He insisted on the first pose being the traditional greet-the-dog pose. That dog is a traitor.
I love sewing for Mr. Bug. No pattern alterations needed. He did mutter a bit about the coat being too small while he was putting it on, but it’s unlined and he’s wearing over a suit. I think once I get the lining in, it’ll be a good fit. I did the ‘pinch test’ and it seems to have a LOT of ease through the chest. The arms are a bit slim and I might sew with 3/8” seams to give him a little bit of extra room for suit wearing. I also have a nice stock of flannel meant for interlining drapes that I’m planning to use to interline the coat.

[Do you see the look of disgust Lucy is aiming in my direction?]

The coat is a bit long, but since it’s so nice and straight through the body, it’ll be easy to hem. At Dan’s request I’m going to drop the pocket placement about an inch from the placement on the pattern piece.
The real coat will be made from wool suiting, black with a sort of windowpane pinstripe. I’m totally dragging my feet over cutting the fabric, on account of the pattern matching required (practiced today on some toile, used Tasia’s excellent tutorial!) Since the center back seam doesn’t provide any shaping, I’ll likely cut on the fold to remove at least one seam.
Dan takes modeling direction well. This is what I got when I told him to stand like superman! Any advice to pass on to him? I have a hard enough time with my awkward hand-on-hip mirror poses**. Also any sewing-for-the-man advice is welcome!
**did anyone notice I branched out with the Lady Grey post to a non-mirror photo session? I devised a photo stand made from a hairclip!)
>My boudoir photo shoot
October 6, 2010 § 7 Comments
>So I put a sweater on and artfully exposed one shoulder to show the elastic spaghetti strap of my self drafted cami (with matching PJ bottoms.) I can report after a night of sleep that swimwear material is very comfy to sleep in and not the cause of night-sweats that I feared! 
The PJ bottoms are flannel-backed satin. I like to use now out-of-print Burda 8143 for my PJ bottoms. The shape of these is more flattering and comfy** than traditional straight-legged PJ bottoms. I made these a bit longer than I like, though. Here’s the technical drawing of these pants.
**It is possible that traditional straight-legged pj bottoms would be just as comfy with 10” of ease around the hips! Not as flattering, though.

One pair of PJs down, I have another piece of hot pink and white polka dotted charmeuse ready for cutting for my second pair, although today is to be spent doing errands, packing snacks for tonight’s baseball game (go Twins!) and working on my Lady Grey muslin, which is hanging exactly where it’s been for the last week!
>The Lady Grey Sewalong! Fabric choosen
September 8, 2010 § 3 Comments
>Gertie at Gertie’s New Blog for Better Sewing is hosting a Sewalong this month for the Lady Grey coat from Colette patterns. I’ve lusted over this coat a little in the past, but wasn’t sure if it would really be that flattering on me – there’s an awful lot of fabric over my hip area where I already have a lot of padding, and I’m not sure a wrap styled coat is my thing, but I couldn’t resist and joined up!

I’ve got my fabric ready to go. For the shell I got a super-funky chartreuse green and brown toile. The toile is 100% cotton upholstery fabric. It’s a little stiff for the jacket, especially with the prounounced peplum, but I think after a washing it will soften a bit and work out well.
I found some brown and white polka dot charmeuse for the lining, although I’d really like to find an orange version of the polka dots to line it. We’ll see what happens.
 |
| My Lady Grey fabric |
I’m really looking forward to the sewalong. Gertie uses great techniques on her garments, which she promises to go over during the project. I think that will help me stay on task and not cut corners! And it will be fun to see how everyone else is progressing in the flickr pool set up for the participants.
I also have two other coat projects that I will be working on. The first is a high priority project! My wonderful husband bought my new sewing machine for me as a gift way back in APRIL, at which time I promised to make him an overcoat as a thank you! We picked out the pattern (Burda 7780), and went to the local scary fabric warehouse (for an entertaining man’s-view of fabric shopping, check out his blog entry!) where he chose some wonderful black window-pane wool suiting and some funky purple-fuchsia lining. I never quite got to the coat, with the weather warming up and a wedding to plan, I figured I had lots of time. Now here we are, coming up on coat season, and I haven’t finished it. I haven’t even cut the pattern!
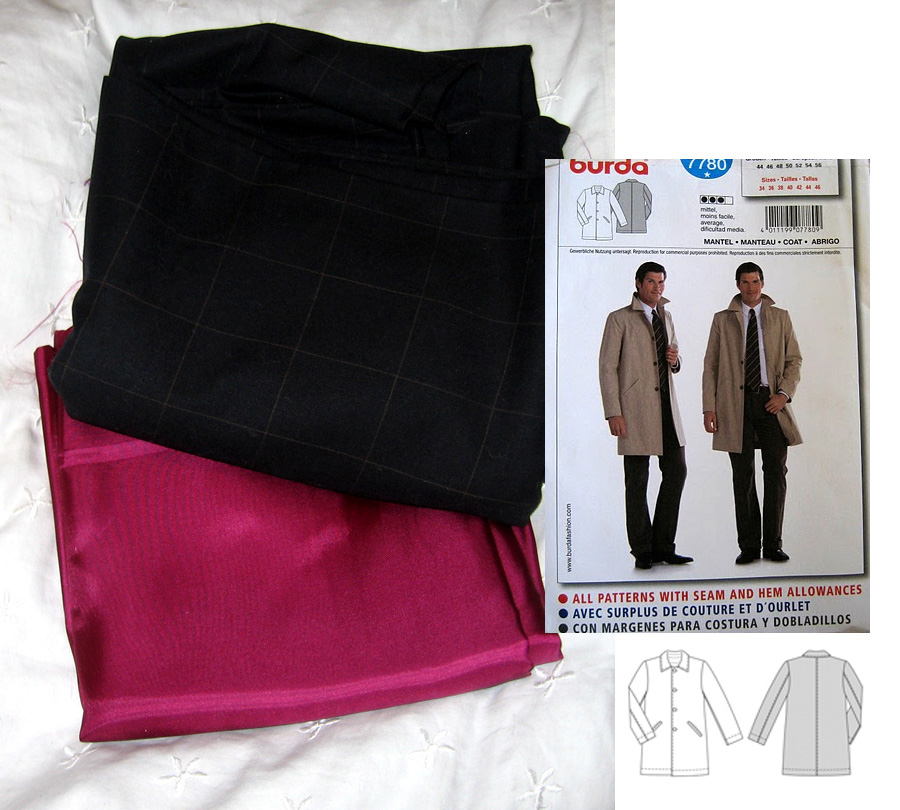 |
| My man certainly has an eye for fabric! |
I think the tailoring techniques that Gertie will be covering in the Lady Grey sewalong will be just as applicable to menswear, so I’ll be working on this project side-by-side with the green toile!
Finally, I had included a longer coat in my fall wardrobe plan and have the pattern cut, the fabric washed and I’m ready to go. I’m using Simplicity 2812, one of the Project Runway patterns with all the mix and match parts. I found a very textured mustard yellow fabric in the upholstery section and had some yellow sunflower charmeuse that will be perfect as the lining. I’m considering underlining this coat to make it last a little longer into the season.
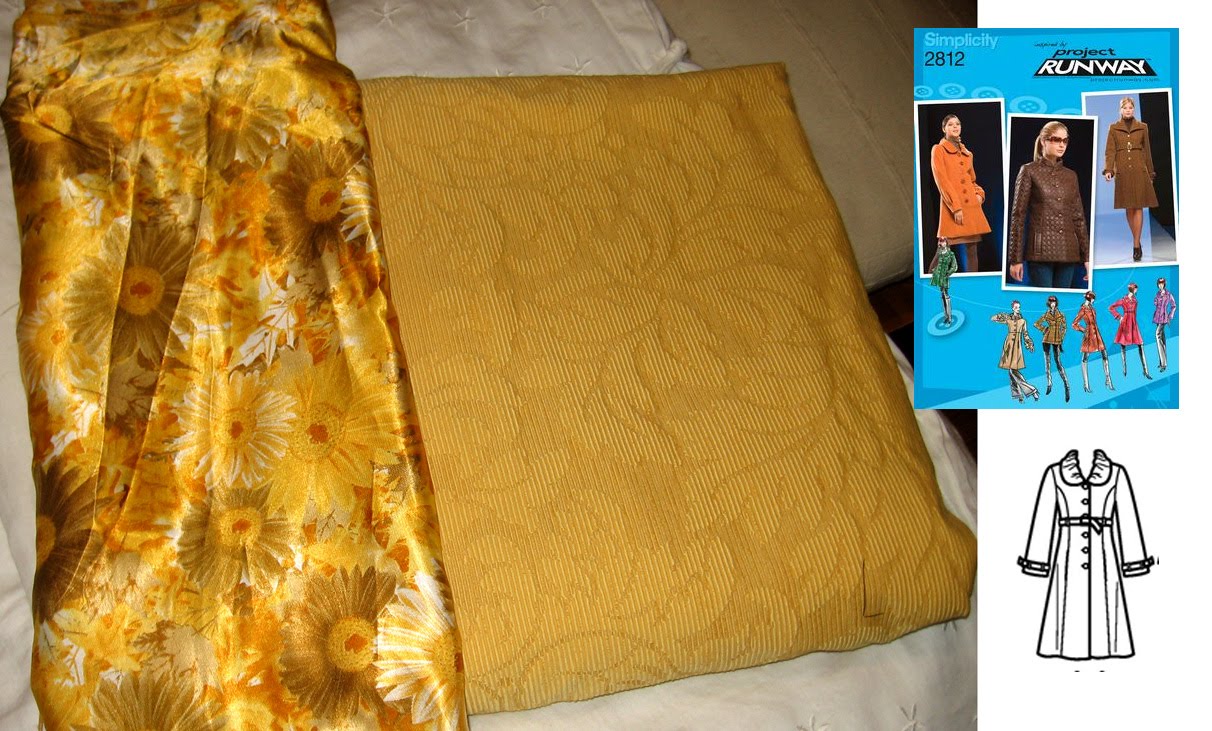 |
| The sunflower coat – long enough to wear with skirts! |
So there we have my coat project. Projects. Many, many coats of many, many colors.
