
>The wheatgrass blouse. With topstitching. Another Simplicity 2601.
March 26, 2011 § 23 Comments
>
Welcome back flood repellant manatees. It’s about two degrees above zero here in the frozen land of Minneapolis. Spring is not likely to ever show up. And yet, I’ve been soldiering on with my spring palette challenge items. I took another stab at Simplicity 2601, my so-far favorite shirt pattern. I even used the exact same sleeve and collar options as my red gingham version. I’m that un-creative. I love the finished version, though!
The fabric is a pretty unruly rayon with a little checked texture. I went nuts topstitching to up the ante. Not only did I topstitch to death, I double topstitched and not with a twin needle! I wanted to get the detail in the midriff band perfect and couldn’t figure out how to do that unless I stitched everything separately. I also ended all the corners (rather than pivoting) and left super-long tails so I could finish and match all the points with a hand needle. Tedious, but effective.
I finished the hems the same as I did on the gingham version – a rolled hem on the serger. I can’t say enough how much of a bear this fabric was to work with. With which to work, I guess I should say. Grammar is hard. Say – for all you serger experts out there, I keep having trouble with super slippery fabrics – they sort of roll after they are cut and the needles don’t catch the fabric. Moving the blade is the answer, right? But which way? Grrrrrr…
Back to the pictures – here’s the view from the back.
I felt like the top of the bodice was just a tad too short on the gingham version, so I added a bit of length to the front and back upper bodice pieces for this shirt by just slashing horizontally and adding in one inch of tissue. This was fine in the back, but the front bodice was a bit too long midway between the center front and the side seam – probably because the bottom of the front midriff piece is curved, and I cut straight across and added tissue, so I was adding more to that area than the center front and the side seams. Unfortunately, the midriff piece is self lined and the front bodice is sandwiched between the two midriff pieces. AND I had serged the seams – I unpicked everything where it was too long, tucked in the front bodice until I liked the look and slipstitched the midriff pieces back to the bodice piece – I had to slipstitch twice; once on the outside and once on the inside. I circled the area that I had to restitch in the photo below.
There were a few other problems that I created by adding length. I had to add an additional button and resize the button underlap (which I didn’t quite get long enough!) I also cut about 3 inches off the peplum because I wanted it to work under cardigans.
Side view!
And a full length shot!
This blouse is finished at the neckline and arms with a single fold bias tape. On my red gingham blouse, I used store bought red bias tape and loved it. This time around there wasn’t any store bought tape that matched in the least bit and since the fabric was so difficult, I was hesitant to make my own. I went with store-bought white, thinking it would coordinate with the topstitching. I’m not 100% happy with the result. The inside is more sloppy than I’d like, what with the super-contrasting bias tape and the numerous lines of staystitching and other things showing up. I probably should have used the white thread in the bobbin while topstitching (I used a darker green – the same stuff I used in the serger and at the rolled hem), but I didn’t want to deal with tension issues and the white thread is that Coats and Clark heavy duty stuff. 
One of the things I love about this shirt is that it makes my legs look freakishly long when I’m wearing trousers!
With the shortened hem, the blouse works under a suit coat. It’s not my favorite look in the world, but if I were back in cube-land, I’d totally make 10 of these for a full two weeks of suit wearing.
And finally, since this is a spring palette challenge item, here I am wearing it with my Marrakesh Drawstring Pants and my refashioned cardi – both made for the spring palette challenge.
And there you have it. Yet another fitted midriff band, peplum-including, article of clothing. I shouldn’t even bother trying new patterns, since I am so fixated on a few designs! That being said, I have been busy at work! I’ve finished the Sew Serendipity classic tailored jacket and am slaving away on the final buttons (covered, with rings) and the buttonholes (appear to be stitched by a drunk monkey, more work needed.) And then yesterday I whipped up Vogue 1027, the best knit dress pattern in the history of knit dress patterns… so I’ll be getting to those soon enough! Until then, stay dry and/or warm. And if neither of those are of a concern to you, well then, I am filled with envy.
>Simplicity 2601… cherries and checks!
February 4, 2011 § 19 Comments
>
It’s done! After slogging through my pattern adjustments on Simplicity 2601 (see my first round of alterations here), I managed to get a wearable shirt! The fabric was delicate, prone to fraying and unfortunately, easily torn with exuberant seam ripping. Also, it was impossible to topstitch. And it was slightly crinkly. Despite ALL of that, I love the finished product! Here’s my wobble-headed posing (and yes, that’s the cherry cord fabric… I’ll get to that in a separate post!)
When I last left this shirt, I had done an FBA which yielded a giant shirt that hit my bustline in the wrong spot. After hemming and hawing, I realized a major part of my problem was that I had added width to the midriff piece towards the center front. This made the angled part of the midriff band slope more gently across my body. I closed up my first adjustment and added the width to the narrow part of the midriff band. Much better. Here’s my super-fly illustration. 
I made another muslin, which somehow ended up being WAY tight. This might have been due to bad cutting, bad foundation garments, bad muslin material. Who can say? I had cut out about 2 inches of width from the midriff band for muslin #2, even though muslin #1 had seemed to have a good five inches too much of ease! I added a smidge back in for my final version – it fits fine, actually a bit on the large side. And I realized that foundational garments have a huge impact on fit of this shirt! Here’s a closeup of me wearing the shirt with a more supportive, well made brassiere…
And here we are with a cheap, non-supportive undergarment…
Foxy, huh?
Constructing the shirt was sort of fun. I serged most of the main seams – shoulders, sides, midriff and midriff lining. I did a rolled hem on the serger for the hem and the sleeves. The pattern instructions have a rather cool finishing using single fold bias tape (I’ve always wondered what that stuff was good for!) that would have been PERFECT with a less difficult to sew fabric. This fabric is thin, stretchy and not super stable. No nice crisp edges or fine topstitching here! It worked well enough, though. Here’s a shot of the shirt inside out – 
And here’s a closeup of the sleeve – showing off the hem! AND the bad topstitching!
The whole button area was a bit labor intensive. There are loops and an underlap – lots of layers to press and stitch to get under control. I was also a bit anxious over the buttons and loops – someone had mentioned online that she’d recently made this shirt and it didn’t stay shut. I can totally see that happening, and I wanted to make sure my loops were tight enough. I used 1/2” self-fabric buttons and the pattern called for 3/8” buttons and 2 inch lengths for the loops. Even though my buttons were a bit larger, I tested a few loops and found that the best size for total security was closer to 1.75 inches. The loops are HARD to get around the buttons – but I can actually put this on over my head if I’m careful!
I love the look of self-fabric buttons! And sloppy topstitching…
Here’s a shot of the button, loop and underlap all undone…
All in all, a fine shirt. The first button up shirt I’ve ever donned that I actually liked! I can see making more of these, even though they’re a bit more labor intensive.
So, in closing, here’s a few more pictures with the shirt mixed with different styles of skirts and jeans. The shape is super versatile for me – I can even tuck it in fairly well! First we have the summer look… sigh. Will my legs ever have color in them again?
It works fairly well with a full circle skirt as well! I love this skirt, but it’s a bit large with a narrow waistband, not a look that works with many things on top! This shirt just covers it all up…

And here’s my pinup, forth of july pose. Because this shirt is clearly asking very nicely to be worn with jeans and wedgies. Where’s my sparkler and hot dog??
>Simplicity 2601. An FBA on a gathered bust, doing the pivot and slide and is checkiness a word?
January 28, 2011 § 14 Comments
>
Hello kittens! I can’t remember if I’ve mentioned this… but a week or two ago I bought a lovely (funky? kindergarten child-like?) piece of green 21-wale corduroy with cherries printed all over it. I plan to make it into another hybrid Jenny. So of course I need a shirt to go with this skirt, which, lets face it, will probably be a fall 2011 garment for me, knowing my sewing speed. Nevertheless, I utilized my normal unproductive shopping technique of envisioning what fabric I wanted for the shirt, then driving to every fabric store in the metro area to find it. Turns out, red gingham silk charmeuse does not exist. But! I did find some mystery rayon at our local scary fabric warehouse of suitable red checkiness to be worn with a cherry-cord skirt! Wow!
So. The pattern. I really, REALLY want to get makin’ my Pendrell which has been nicely cut up and waiting for the wax paper treatment for a few weeks! And as much as I love the pattern, AND think it would be adorable in mystery-rayon-with-red-checks, I wanted a shirt with a little more structure. Enter Simplicity 2601, which has been stewing, cut but unloved, in its envelope since July. I actually cut this pattern while I was on my honeymoon. Yes, chickadees, I brought patterns to cut while I was on my honeymoon. That’s how I roll. In my defense, Mr. Bug ran a MARATHON during our honeymoon! Here’s a line drawing of the version I’m doing. I’m telling you, I have never seen a midriff band that I didn’t love.

So this post is all about my pattern adjustments, super-generous wearing ease and other little tidbits. First, to acquaint you with the pattern, here are most of the pieces laid out – I didn’t put the underlap (for under the loops and buttons on the front) or the loop placement piece on the table for the pic, but I think I got everything else…

I started out my ‘adjustments’ while cutting the pattern. I cut a size 18 though the neck and shoulders, then veered out to a size 22 on the side seam of the bodice pieces – the midriff and the bottom of the shirt were all originally cut on the size 22 lines – here’s a photo of my ‘veering’ on the bodice pieces –

Figuring the adjustment amounts
So once everything was cut, I did a little math. I had cut the shoulder/arm/neckline at a size 18 because the size 18 bust measurement matches my high bust, as many of you know. I needed to add 5 inches to the bust area to get to my actual bust measurement. After looking at the envelope, I decided to add another 5 inches to the waist, and six inches to the hip area. I calculated these measurements by just adding to the sizing measurements on the envelope – I wasn’t sure how much ease the pattern had and this is one of those annoying patterns that only lists the finished bust measurement, which wasn’t helpful at all!
Full bust adjustment – gathered bodice
For anyone new to the game, there’s a general order to your adjustments. When adjusting a blouse pattern such as this wacky animal, you start with the bust, then the waist then the hips. This particular pattern is nice, because it has a midriff piece (easy to size!) and the bust shaping is created with gathers – so getting the measurements perfect isn’t as key, because you can just adjust the gathers. Or rather, I can adjust the gathers. Unless anyone wants to sew a shirt for me?
I snapped photos along the way in hopes of being informative. I was doing the FBA from memory (even though Fit For Real People was sitting RIGHT THERE on the cutting table!) I’ll go through this fast, for a more detailed FBA tutorial (although for princess seams, not a gathered bust) check out my Lady Grey tutorial.
First, I made the cuts shown below – Cut 1 is from the bottom of the bodice piece, up to the bust apex (the fullest part of your bust, basically.) Cut 2 is from the bust apex to 1/3 of the way up the armscye. Stop about 5/8” from the edge of the pattern piece, then cut from the edge in to where you stopped cutting, in order to leave a small paper hinge and not lose pattern pieces if a brisk breeze starts blowing for some reason in your cutting area. Cut 3 is from the side in to the bust apex, again leaving a little paper hinge (pretty easy to see in the photo!)

Next step is to start securing the pattern. Most books and other smart people will tell you to use pins to secure the pattern piece to a piece of cardboard while you’re working. I don’t do that. I use wax paper for my adjustments and it’s easy to peel scotch tape from wax paper, so I usually will just put a big piece of wax paper under the area I’m working on and use tape instead of pins to keep everything in place – sometimes I tape the wax paper to my work surface to keep that in place.
For this step, secure the area I’ve circled below in pink – it’s on the side where the center front is.

Now for the actual FBA part! I had determined that I needed to add 5” total to the shirt to make it fit. That means I need to add 2.5” to the front bodice piece – on this shirt, there are two pieces that make up the front bodice. Sometimes there’s four (like with a princess seamed shirt) so I’d divide the total needed by 4 instead of 2.
To add the width, slide the left side of the pattern over until the two vertical straight edges (highlighted in pink below) are spread apart by the amount needed for your FBA (for me, 2.5”) – see how I used the grid on the cutting mat to help line things up? Once you get everything all lined up, go ahead and tape where I’ve circled below. Once you make this change, the bottom of the bodice that’s on the side where the center front seam is (the right side in the photo below) will be much shorter than the other side. That’s because you need extra length in your bodice to get over your bodacious bosoms. Make a horizontal cut (outlined in pink below) and slide the bottom piece down until it lines up with the the other side. Tape onto the tissue and wonder for a while what’s going to happen with that giant wedge on the other side of the pattern.

Closing that wedge is actually quite easy. At least, it is for what I’m doing. You just swing it shut and tape it. You may wonder why the cut was even made in the first place, I did. If we had just made the cut from the bottom to the bust apex to the arm, and swung the pieces apart 2.5 inches, we’d just be adding width, no length. And the length is a very important part of an FBA – nobody likes a weenie seam right across the bodacious bosoms, right?
Final note before moving on – that whole giant amount of wax paper at the bottom of the bodice piece is in the area where there are gathers. This pattern was easy to work with as most of the bottom edge of the bodice piece gets gathered while sewing everything together. If you’re working on something with just a small area of gather, you might have to be more creative in the placement of the cuts you make as it’s nice to bury all that extra width on the bottom of the bodice in something like a gather or dart – for that lovely wasp wait look, right?
Adding width to the waist /midriff piece
FBA done, it’s time to add width to the midriff piece – the waist point on this pattern is actually right below the midriff piece, but I went ahead and added my five inches to the midriff piece. The adjustment was pretty easy – I slashed the pattern piece and spread 2.5 inches and taped up. I had to redraft the curve a bit. I really need to buy a french curve, I always eyeball this stuff!
Here’s the photo – the center front is on the right side. I’ve shown in pink where I sliced off a little point of the original pattern. I sort of chose the position of the adjustment arbitrarily – I thought it made the curve look nice. 
Adding width to the hips
Final step is to add width to the hips. I always want MORE room around the hips, and my calculations had said to add 6 inches to the bottom part of the shirt. I started out by adding 5 inches by slashing and spreading the bottom front piece in the same place as the midriff piece. I lined up the pieces using the notch marks. The pieces don’t line up exactly because there is gathering that happens to the bottom piece.

The Pivot Method
I still needed another inch, but really wanted to give myself more wiggle room. I decided to use the Pivot and Slide technique. Well, really, just the pivot technique. I remember reading about that and not knowing what it was for the longest time, so I snapped a bunch of photos while I was doing it!
First, I outlined the side seam (ok, I just marked the corners!) of the bottom shirt piece on a piece of wax paper. All of this is shown in purple marker on the wax paper. I slid the pattern piece to the right so you could clearly see the markings!

Next, make a nice vertical adjustment line to the left of the pattern piece. I decided to add 1 inch to the bottom hem of this piece, so my line is 1 inch over.

Next, slide the bottom of your pattern piece until the very corner meets up with the vertical line you just drew. Keep the top corner stationery while sliding over the bottom corner. This is the ‘pivot’ part and you might find it helpful to stick a pin in the upper corner to hold the pattern piece in place, yet allow it to move freely. The ruler is just doubling as a paperweight in the photo.

Now trace the outer edge of the pattern piece! Must trace this time around – marking corners won’t cut it! transfer any notches, etc.

Now return the pattern piece to it’s original position (line it up with the first marks you made) and continue the hemline in a natural arc. Tape everything down and cut that baby out! That’s it! That’s all there is to pivoting (note, again, most guides would have had a cardboard backing and a nice pin involved, I just skipped that part!)

OK, you’re not quite done. Since we made the change to the side seam of the front, we need to also change the side seam of the back pattern piece. I usually do that by making a wax paper sandwich. Adjusted piece on the bottom, sheet of wax paper, then unadjusted pattern piece on top, perfectly lined up with the adjusted piece on the bottom. Trace the new sideseam of the adjusted piece to the wax paper (you’ll be able to see it through the wax paper!), tape the pattern piece to the wax paper, make sure everything is lined up. I tried to take a photo, but it’s sort of hard, what with wax paper being transparent and all…

Other adjustments
Just in case any of ya’ll are actually making THIS shirt, and want to use THIS guide, I snapped a photo of the other pattern pieces that should be looked at – the underlap and the loop/button placement template. Since we substantially altered the length of the bodice, neither of these pattern pieces will be perfect. I will probably just eyeball/freehand to fix. I also will line up the paper collar piece after doing an FBA to make sure that none of the seams that touch the collar were altered – they weren’t in this case.

How’s it look?
Adjustments made, I whipped up a nice, one-armed tablecloth and safety pin version. Tres chic, as they say. Here’s the result (and also, the most flattering photo…)

Main complaints: midriff band is too loose, the arm is too tight and the top of the midriff seam (again) is hitting me just where I don’t want it – here’s a closeup so you can see what I’m talking about – I’ve marked in pink the way I ‘d LIKE the midriff piece to fit!

Here’s a few more views…


Where! Lots of pictures! Up tomorrow – the second round of adjustments and another muslin. Also, in local news, I finished my Negroni today! We didn’t have time for a photo shoot, though! I also ticked one more item off my to-do list – a rick-rack bedecked, mini peplum having, thermal floral knit tank top (cut last summer, sewn today…)
Good night, porci-penguin friends…. {I’m feeling spikey and avian today}
>Operation birthday jammies. And labels!
October 3, 2010 § 7 Comments
>Well! I’ve been on blogging black-out since Thursday while working on my birthday present for Mr. Bug – pajamas. The first man-project of every home sewist, right? The jammies were well received, the fabric was sweatshirt fleece and sinfully pricey flannel coupled with judicious (first time) use of my sewing machine’s embroidery function. Also, with a little help from Nikol, blogger and owner of Sewtropolis, I copied Tanis-Isis’s** label-making project so Mr. Bug would not have to sleep with his pajamas on backwards.
**OK. Isis’s?? Isis’?? Those pesky apostrophes!
 |
| [Mr. Bug and Lucy the hound lounging in their new jammies] |
After hemming and hawing over what to purchase and/or make for the yearly birthday, I decided on jammies – more for lounging than sleeping. I found Simplicity 5271, appealing because of the cargo pockets (because patch pockets are so difficult to draft on my own, you know) on the PJ bottoms and the raglan shirt for the top half. I couldn’t picture Dan in the traditional button up PJ top!
I found some awesome, super thick and soft flannel at Hancock ($10 a yard!!) in a grey and white plaid. Not only did I want fabrics very soft and cozy, I also wanted fabric that wouldn’t show off Lucy’s white fur like crazy (like his other loungy pants that are all black or dark blue!) The shirt is meant to be sewn up in a knit and I pawed through the selections, finally deciding on a cotton jersey – white with blue sleeves. No grey available. On my way to the cutting table I spied a couple bolts of sweatshirt fleece – enough stretch and the perfect shade of grey! I’m not a huge fan of sweatshirts, but thought the idea of a baseball-style shirt in sweatshirt fleece sounded fun!
Once I finished the pajamas (my review on patternreview.com is here), I had enough scraps to make a little matching bandana for our basset hound, Lucy – I thought they’d like to have matching ‘outfits.’ I cut a triangle, finished the short edges with a scrap of bias binding, and finished the long edge with a strip of the selvedge edge. I sewed one of my new little tags on the bandana and used the embroidery function on my mid-range Singer to embroider her nickname on as well – Lucybear. Having gone that far, I added Dan’s nickname, Papabear, (can you guess my nickname?) on the hem of one of his sleeves.
 |
| [The 3 bears pajama collection] |
My favorite part of the whole project was making labels! I bought a couple sheets of paper-backed fabric meant for use with a ink-jet printer and marked as colorfast. It was $5.99 for 3 sheets and I found them in the quilting section at Joann’s. I used Illustrator to make the label – it’s a line drawing of Lucy that I drew and we used for our wedding invitations. It also says ‘3 bears’ – a play on our nicknames, not on our constant rejection of breakfast cereal.
 |
| [a sheet of freshly printed labels] |
I printed then let dry for 10 minutes, removed the paper backing, then set the ink with a super-hot iron with no steam. To make the ink colorfast, I rinsed in cool water (I crumpled well to get the look I wanted), laid flat, patted dry with paper towels, then completely dried with a super hot iron. I cut apart with pinking shears. I think I’ll tea-stain the rest for a little more of a vintage, rumpled look.
 |
| [Freshly ironed, crumpled and ironed again. And pinking shears!] |
 |
| [Labels close up. There are a lot of church-going birds in our house.] |
We love, love, love the labels and are planning on labeling everything. gloves, kitchen towels, Lucy…
>The Lady Grey Sewalong! Fabric choosen
September 8, 2010 § 3 Comments
>Gertie at Gertie’s New Blog for Better Sewing is hosting a Sewalong this month for the Lady Grey coat from Colette patterns. I’ve lusted over this coat a little in the past, but wasn’t sure if it would really be that flattering on me – there’s an awful lot of fabric over my hip area where I already have a lot of padding, and I’m not sure a wrap styled coat is my thing, but I couldn’t resist and joined up!

I’ve got my fabric ready to go. For the shell I got a super-funky chartreuse green and brown toile. The toile is 100% cotton upholstery fabric. It’s a little stiff for the jacket, especially with the prounounced peplum, but I think after a washing it will soften a bit and work out well.
I found some brown and white polka dot charmeuse for the lining, although I’d really like to find an orange version of the polka dots to line it. We’ll see what happens.
 |
| My Lady Grey fabric |
I’m really looking forward to the sewalong. Gertie uses great techniques on her garments, which she promises to go over during the project. I think that will help me stay on task and not cut corners! And it will be fun to see how everyone else is progressing in the flickr pool set up for the participants.
I also have two other coat projects that I will be working on. The first is a high priority project! My wonderful husband bought my new sewing machine for me as a gift way back in APRIL, at which time I promised to make him an overcoat as a thank you! We picked out the pattern (Burda 7780), and went to the local scary fabric warehouse (for an entertaining man’s-view of fabric shopping, check out his blog entry!) where he chose some wonderful black window-pane wool suiting and some funky purple-fuchsia lining. I never quite got to the coat, with the weather warming up and a wedding to plan, I figured I had lots of time. Now here we are, coming up on coat season, and I haven’t finished it. I haven’t even cut the pattern!
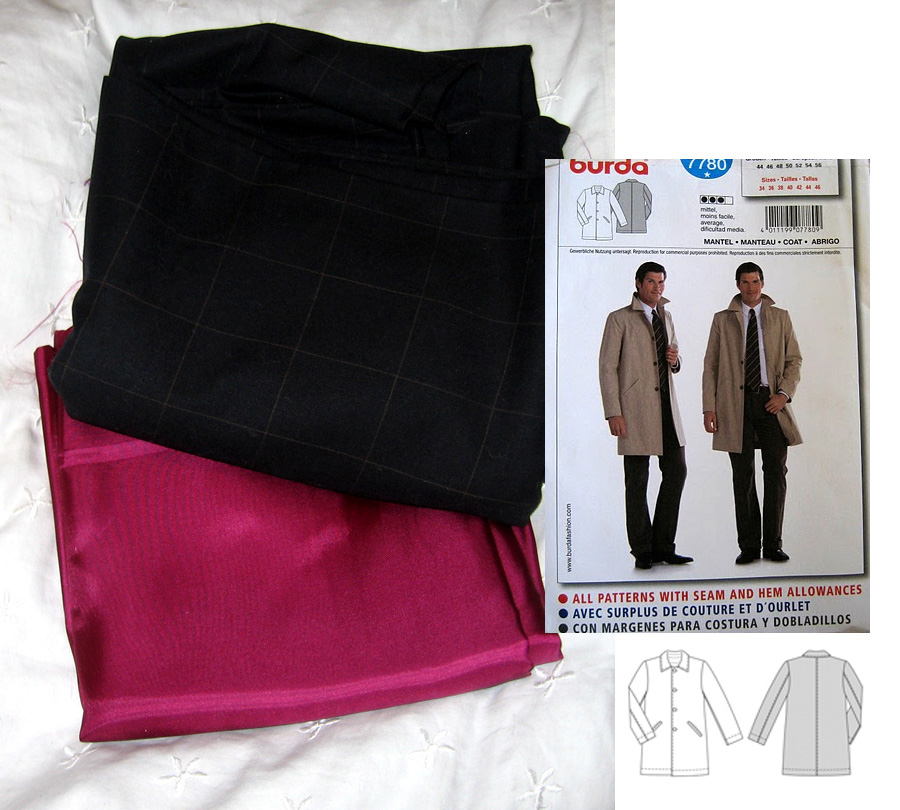 |
| My man certainly has an eye for fabric! |
I think the tailoring techniques that Gertie will be covering in the Lady Grey sewalong will be just as applicable to menswear, so I’ll be working on this project side-by-side with the green toile!
Finally, I had included a longer coat in my fall wardrobe plan and have the pattern cut, the fabric washed and I’m ready to go. I’m using Simplicity 2812, one of the Project Runway patterns with all the mix and match parts. I found a very textured mustard yellow fabric in the upholstery section and had some yellow sunflower charmeuse that will be perfect as the lining. I’m considering underlining this coat to make it last a little longer into the season.
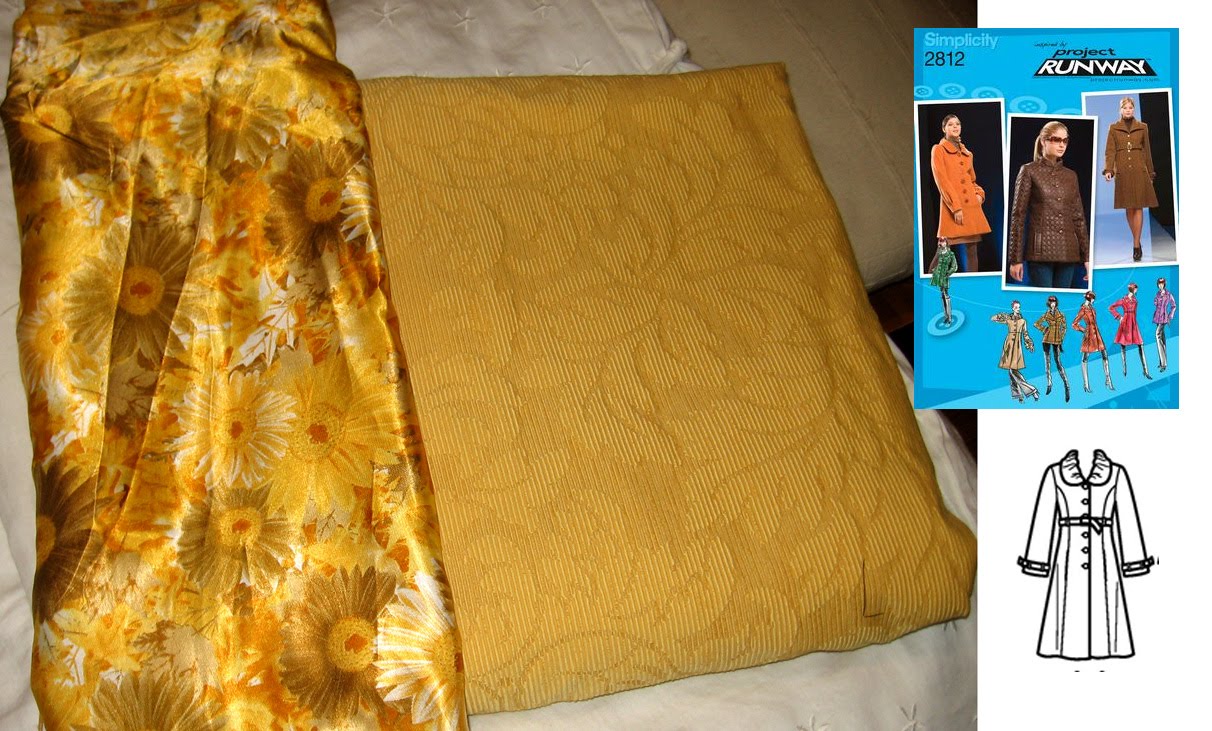 |
| The sunflower coat – long enough to wear with skirts! |
So there we have my coat project. Projects. Many, many coats of many, many colors.
>Self-Stitched September Day 7. Starting to see what it’s all about
September 8, 2010 § 2 Comments
>Here is my Day Seven outfit…
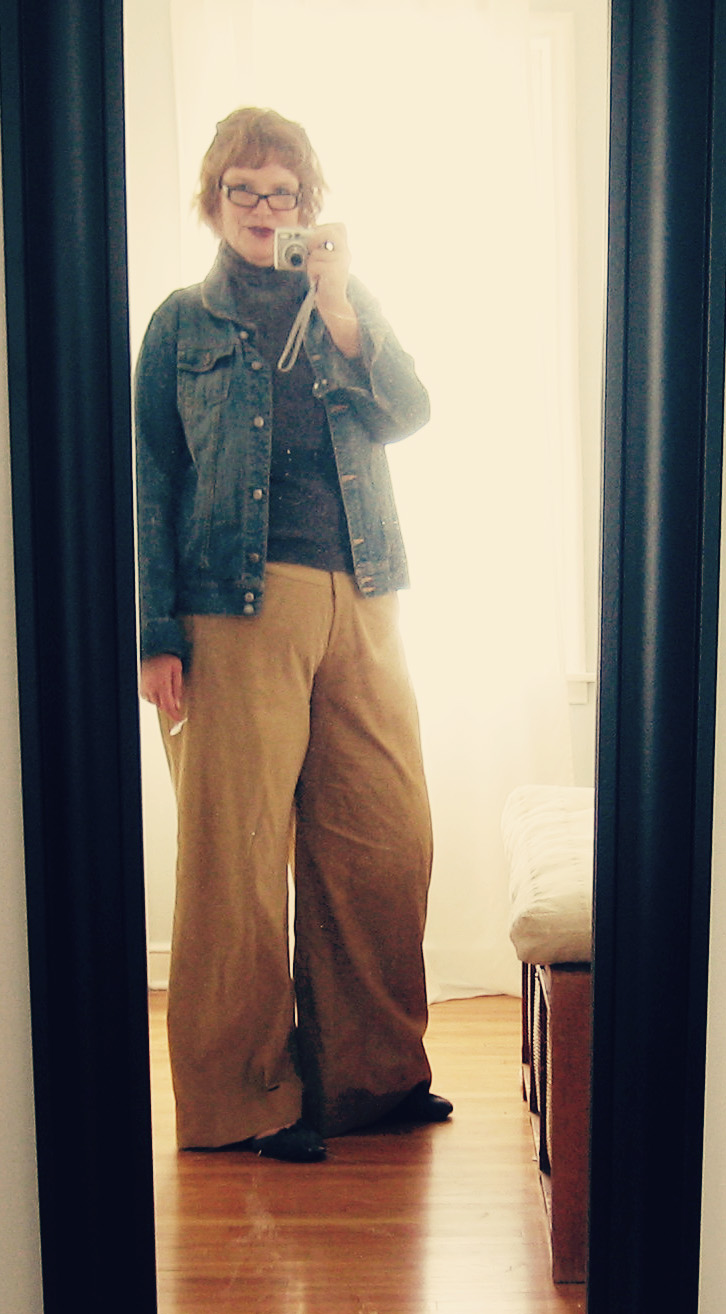 |
| It looks like I’m holding a cigarette in my right hand! Does it make me look cooler?
I spent the day working on the dress for a wedding we are going to on Saturday, doing chores and running some errands. It’s definitely cooling down here in Minneapolis! The shirt and jacket are both from old navy and I’m considering a refashioning project on the shirt. Converting from a turtleneck to a scoop neck, removing the evidence of a food-realted incident. The trousers are Simplicity 2562, worn for the second time this week! I’m hoping to get another pair sewed up today, but had to seriously redraft the wedding dress and may have to do another muslin round, so I’m not sure if I’ll have time!
|
So it’s been a full week of self-stitching and I see why everyone was so positive about me-made-may! I’m really enjoying a lot of the aspects of this online-project so far.
1) Anything that helps me focus on sewing goals is, as Martha says, a good thing. ! I just started sewing garments around January of this year and wearing ‘plus sizes’ (good lord, I hate that phrase!) I’ve never gotten to really express my style, being constrained by what was available in my size. So I’m like a kid in the candy store, buying expensive, impractical fabrics and focusing on dresses… dressess… dresses. And jackets. But right now I’m a stay-at-home wife and hound-mom and the garments I’m making aren’t practical for my lifestyle. More pants. More casual shirts. Less compulsive purchasing of wool suiting, silks and upholstery fabrics!
2) Related to #1, SSS forces me to focus on closet (and sewing stash/supplies) organization. We live in a fairly small house, although at least it’s a 50’s ranch so we have decent closets. But… I’m starting to run out of closet room. My husband and I are anti-pack rats. If we don’t use it in six months, it gets donated, sold or tossed. This project is helping me evaluate what I really need in my closet. And clothes that I sort of like, but don’t fit well or aren’t quite the right color or really my style are out of here!
3) Getting up and facing the world with a little style! Again, stay-at-home hound mom! I was laid off over two years ago and have learned that it’s very important to continue with routines and ‘dress’ for the day. I still wear lipstick, even though it’s just the basset hound and the mailman who see me. I feel better when I look better, and I think it’s nicer for Dan to come home to me looking the way I did when we started dating, instead of wearing pajamas! Self-Stitched September really has me focusing on what I’m wearing and how I look (knowing I will have be snapping a photo at some point helps!)
4) Allocating sewing time. It’s easy for me to get caught up in the details and not plan out what I’m doing when. SSS helps me stay focused and balanced. I’m going to a wedding on Saturday and am still working on the dress, but I also have to keep working building my basics wardrobe!
5) Blogging! My first blog was a a general cute-animal-pictures and interesting-news-stories blog that I started when my husband and I first started dating. He likes to blog about the same general thing (less cute animals…) and it was fun when we weren’t living together to ‘communicate’ that way. When we moved into the house, I started this blog with vague thoughts of more home decor/improvement projects, but wasn’t consistent. I like blogging for a variety of reasons – I like being able to look at projects I’m working on, I like working on my writing skills, I hope to be a resource to others, Dan enjoys reading it (less so, now that it’s SO sewing oriented!) and I like the discipline of a daily (or nearly daily) responsibility. This is really helping me get something posted every day!
6) The sewing bloggers! Wow! I love the energy of the sewing bloggers! There are the blogs focused on technique, on style, on vintage life, on feminism, personal observations – I love them all! And it’s really fun to see a comment or a new follower (I have FOUR!!) of folks coming to look at my blog! And seeing everyone’s projects by reading blogs on bloglovin and on the Flickr pool is inspiring and fun!
Here’s to 23 more self-stitched days of September!
>Self-Stitched September – Day 4… my first trousers!
September 4, 2010 § 2 Comments
>Spurred on by my increasingly obvious need for more casual clothing, I went shopping yesterday and picked up a couple of pieces of corduroy for the making of trousers and Jenny skirts. I spent the night puttering away and am quite happy with my first official** self-made trousers!!
**Ok, I’ve made pajama bottoms and trousers for my mom. My first non-elastic-waist trousers!!
So here’s my Day 4 outfit, self-made trousers, Old Navy (of course) tank, and New York and Co cardigan (and orange Rocket Dog wedding shoes!!)…

So when we last visited my trouser-fitting, I had finished the last muslin and was ready to start with the real thing! I pretty much made these exactly the same, except I sewed the entire side seam except the waistband with a 5/8″ seam instead of the 1″ seam that was part of the pattern piece. I just wanted them a little looser and I was so excited to get sewing, I didn’t pre-wash, so hopefully, these won’t be a one-time-only pair of pants!!
I used silk organza as the interfacing and liked working with it! I’ll have to stock up on more of this – I have about 4 yards of a dark brown right now, so that should get me through a few projects. I skipped the pockets because I don’t like the way they gap on most pants. I always think of dear Michael Kors, stating that ‘every woman he knows sews their trouser pockets shut’ on the first or second season or project runway? Really? I’m surprised that all of his female friends can sew!
Since these were meant for casual wear, made under a deadline and only one step up from a wearable muslin, I only did minimal finishing. I pinked the seam allowances and I hemmed by finishing off the raw edge with a zig zag and turning up topstitching about 2″ from the hemline. I also topstitched the waistband facing instead of understitching – partially because I HATE when the facing peeks out and also because I wanted a slightly more casual feel and for the hem treatment to look intentional.
There are still a few fit issues – I think there’s a little too much fabric in the front of the trousers. There’s an excellent series of tutorials on fashion-incubator.com covering fit issues that helped me fine tune the pattern, but I could do a little more in that area. Also, the back is just a little baggy near the top of the thighs. And I still have that strange fold on the top left thigh that is connected to the zipper in some way.
Here’s the final trouser-collage! What a terrible series of photos!


>Self Stitched September Day 1 – the wheels are coming off the bus
September 2, 2010 § 1 Comment
>Well! Self-stitched September started off with a bang! I actually spent a majority of my day in what could be loosely termed as ‘refashioned’ clothes – alas, no pictures, but I was in the garden wearing (1) a pair of cut off jeans that I cleverly made cargo and ipod pockets for using the ‘cut off’ part (2) a five-dollar Old Navy tank top that was ratty two years ago when I hacked off the lace that was looking very sad spiderweb and (3) my gardening galoshes (hot pink, white polka dots) that sprung a leak last spring. I, in a MacGyver-styled move, fixed yesterday using super-shiny duct tape from my husbands secret stash. If that’s not a refashioned outfit, I’m not sure what is!
But I did take a shower later in the day and head over to a friend’s house wearing my ‘official’ Self-stitched September outfit… The skirt is Butterick 4877 a super cute out-of-print pattern that I liked so much I actually bought (at the full out-of-print price) from the Butterick site. It’s a pencil skirt with a faced waistband, double darts on the front and the back and different ruffle and pleat options for the bottom edge. This was a quick honeymoon version that I skipped the bottom ruffle on and sewed up in 45 minutes out of my stash of white denim that was waiting to be made into a slipcover for our bed. I like think of my style as slipcover-chic…
 |
| self-stitched September, Day 1. wet hair, no lipstick. |
>The final pants muslin. Fashion fabric cleared for cutting.
August 24, 2010 § 1 Comment
>One more muslin and a few more changes and I think I’m ready to start on my first real trousers not made from bedsheets! Here’s the final lineup…
 |
| front view |
 |
| side view |
 |
| back view |


 |
| first step in dropping the center front seam |
 |
| evening out the front waistband |
 |
| dropping the centerfront has the odd effect of raising the waistband!! |

 |
| marking where to add width in the hip area |

 |
| the final muslin! |
I have some nubbly, bumpy ivory woven and white rayon ambience lining that will soon be trousers… hopefully by the end of the day!
Here’s a recap of my trouser-fitting posts…
Part III – The final pants muslin. Fashion fabric cleared for cutting.
Part II – The second pants muslin – amazing what an eight of an inch can do!!
Part I – I really, really don’t want to do this – making my first pair of pants…
>The second pants muslin – amazing what an eighth of an inch can do!
August 23, 2010 § Leave a comment
>
 |
| really like the shape of the legs! |
 |
| the side view is alright, not my favorite, though. |
 |
| the back is the most troubling – lots of folds! |
All in all, I really do like the results and am tempted to just go on to the actual pants and not do another muslin. I really, really liked the ‘amazing fit’ features of the simplicity pattern – mainly that there are 1 inch seam allowances in the center back and side seams to allow for better fitting and there are pretty good directions (and drawings) for what to do if things aren’t fitting right. There’s something about the way that the pattern pieces fit together for trousers that completely confuses me as to what seam needs tinkering with to get the fit right!
I did make quite a few adjustments – unfortunately I was camera lazy yesterday, so there are no before/after shots of the problem areas, but I did take some pictures of the changes I made and can go through those!
But first! The pattern adjustments!
Before I even cut the fabric for the muslin, I did make a few pattern adjustments. These pants run up to size 22 and I needed to grade up 4″ in the waist and 5″ in the hip. I was concerned that if I just added to the waist and hip area, I’d lose the line of the legs, so I just cut the leg patterns vertically (from hem to waist) and added 1″ of wax paper evenly from top to bottom to add 4″ to the width of the entire pattern. I knew that this wasn’t quite enough for the hips, but figured with the wider seam allowances, I could tinker once I got the pattern pieces put together. I also added 1″ to the waistband pieces. Finally, for the muslin I skipped the pockets, taping the yoke piece to the front pattern piece so it was the right shape. I will probably not add pockets to the final pants either, they just don’t look very good!
The first tweak – too tight across the hips!!
After I finished the muslin and tried it on, the first problem area was general tightness right across the hips – not surprisingly, since I knew I was around an inch short. It was pulling a bit and a little uncomfortable. I re-sewed the side seams starting right at the top of my thighs and going up to the waistband. The original seam was 1 inch and I sewed with a 5/8 seam allowance, adding an inch and a half total.
 |
| Adding 1.5 inches to the side seams |
I tried on the muslin again and it was still feeling a little tight across the back, so I added a bit to the center back seam – starting right where the back starts curving towards the waist, and angling back in below the waistband. You can see how there’s a sort of a curve added right in the back (the blue line) – which, unfortunately, is the way I’m shaped!
 |
| adding to the centerback seam |
The second tweak – adding ease to the seat of the trousers
After making this change, the hips felt like they were fitting much better, but there was still some tightness in the seat of my pants. After going over the instructions, I resewed the ‘back crotch’ seam at 3/8″ (the original was 5/8″) to add a little room. I started right where my resewn centerback seam ended and ended the new seam at the intersection of the center and inseams.
 |
| adding ease to the seat of the pants |
All the changes feel better, but still not perfect. And you can see in the ‘back view’ above that there are a lot of wrinkles happening!
The final tweak – removing the bagginess from the front of the trousers
The final adjustment I made on this muslin was a MAGIC ONE!! I always have a problem with sagginess/looseness right in the front crotch area – I think it’s because a lot of my extra inches are in the back, not the front, so in order to get pants that fit well across the seat, I end up with too much fabric in the front. I’ve never really known how to fix that, but the Simplicity instructions suggested resewing the inseams the full length 1/8″ at a time. I didn’t really want to lose width the whole length of the leg, so I resewed the inseam at 1/2″ (original seam was 5/8″) starting right at the top of each leg and angling to meet the original stitchline about 6″ down the leg. It really made a world of difference!
 |
| removing the bagginess from the front of the trousers |
OK. I’ve clearly got another muslin in my future. I’m fairly certain that there’s something more that needs to be done with the crotchline – either dropping the whole thing or scooping out from the back… we’ll see….
